Creating a Modded Server with Conquest Reforged
Making a modded server for Minecraft can be a bit tricky, especially when the process changes across different Minecraft versions, guides become outdated, and instructions can be a bit too technical or vague. As such, I’ve put together this guide to make the process a little bit easier for those who are inexperienced with servers and want to start playing Conquest Reforged with a few friends.
You’ll first want to decide whether you want to rent a server from a host or run a server off of your own computer.
Also, please note that Minecraft Realms do not support mods.
SERVER HOSTS:
Renting a server can make the setup process much simpler, and it’ll also be online 24/7. You’ll probably want to go this route if your own machine/computer isn’t strong and doesn’t have RAM to spare. I've tested different server hosts geared towards Minecraft, and for us Witherhosting has worked best, as it offers fairly good performance for a reasonable price. In my experience, many server hosts charge a premium that ends up going to unnecessary features and loads of marketing.
Witherhosting offers many different plans, as will other hosts. Conquest Reforged on the server-side actually isn’t very demanding in terms of RAM, alth. This is largely because the server doesn’t have to load and cache all of the block models and textures; all of this is handled by the client (ie: your computer). Minecraft itself seems to be the culprit of higher RAM levels being necessary. Most of the server resources go towards actually running the world, the entities in it, and supporting all the players online. I'd recommend at the minimum a plan with 4gb. You’ll want to scale the amount of RAM up depending on how many people will be playing at the same time, how high you have certain settings turned up like render distance, and if you want to do large-scale WorldEdit operations.
After purchasing a server, you’ll need to install Conquest Reforged on it. You'll only need the Conquest Reforged mod installed. The CR Recipes mod, and Conquest Medieval Weapons and Armors mod are optional.
RUNNING A SERVER ON YOUR MACHINE:
If you have RAM to spare, want to save some money, and don’t care about your server running 24/7, this is probably the route you’ll want to go. In any case, the steps taken for this process might be useful to know for those of you who want to explore more advanced server configurations or host larger servers, perhaps on a machine dedicated to running your Minecraft server.
For Minecraft 1.15.2:
- First, create a folder for where you want to store your server’s files. This can be pretty much anywhere, just make sure that you have read/write privileges in the location and that it isn’t a space for temporary files that get deleted.
- Download the Forge installer for 1.15.2. The latest will do.
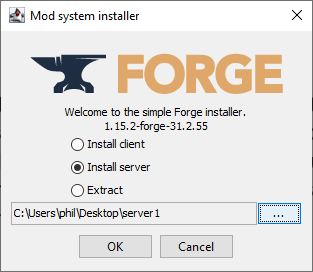
- Run the Forge installer. You’ll need Java to be able to do this as well as your server. Choose the 64-bit version. Select “Install server” and enter the file path for the folder you made in step #1.
- Navigate to your server’s folder. Run “minecraft_server.1.15.2.jar”. This will generate the “eula.txt” file. Open that and change “eula=false” to “eula=true”.
- Run “minecraft_server.1.15.2.jar” again, this will generate additional files you’ll need to run and configure your server, such as a whitelist, ban list, world save, etc. A window called “Minecraft Server” should have opened. This is your server console. Close it for now.
- Open PowerShell or cmd in your server’s folder (hold shift and right click the empty area of the folder). Run the command:
java -Xmx4G -jar forge-1.15.2-31.2.55.jar
Note: -Xmx4G means I’ve assigned 4gb of RAM to the server. Change this argument as you see fit. Also, Forge may update at some point, or you may have downloaded the recommended rather than the latest version. Simply replace forge-1.15.2-31.2.55.jar with whatever forge jar is in your server’s folder to get this working properly. - Your server is running! However, you properly don’t want to open PowerShell every time you want to play. You can make a BAT file (eg: launchserver.bat), open it in a text editor, and paste in the command we used above. With that, just double click the bat file and your server should launch.
- Install Conquest Reforged by dropping the mod jar from the link into your server folder’s mods folder. For all other mods you want to install, this is how you do it. Remember, client-side mods such as Optifine or the resourcepack should notbe installed here!
- Now you need to allow for other people to connect to your server while it’s running. The easiest method is to install Hamachi. A harder method (if you haven’t done it already for other games) is called Port Forwarding. Since this method varies according to your hardware and can carry some security risks, I won’t be going into this method.
- With Hamachi installed and running, click the Network tab and make a new network. Make sure everything is online in Hamachi. You should see something resembling an ip address (eg: 26.73.1.114). This is what you and your friends will want to use to connect to your server.
Common Issues:
“I can’t use Conquest Reforged blocks on my server, but I can in singeplayer!”
- This means that your server isn’t running Conquest Reforged and you haven’t installed it properly.